

There's a few ways one can paint their kitchen cabinets. You can brush, roll, or spray the paint on. I chose the really, really hard and painstaking way. See, I didn't want the wood grain to show through. And that's not easy when you're working with oak. Oak has deep pores. And it's stupid and not a friend of mine anymore.
We've been with out a kitchen for 8 weeks now. 8 very long weeks of eating out. Might I remind you I should be on a wedding dress diet. Unless a wedding dress diet consists of pizza and beer, in which case, I'm right on track. Then again, maybe the 80 hours I've invested in working on the kitchen helped burn off some of those chicken wings.
You read that right, 80 hours and 4 weekends. Any day I didn't have work, I worked on these
I wanted my cabinets to look professionally painted. For the record, I am not a professional painter. And I would have rather paid for new cabinets than hire a painter. But I did what any really good painter would do, and I took my time and painted the right way. Our kitchen was far from being finished anyway (and we still hadn't decided on paint color and finish options) so we were okay with living with out a kitchen for a bit.
Here's how I prepped the cabinets to get a professional finish:
Step 1: First, I removed the doors from the cabinet boxes and removed all hardware. I'm not reusing any of the hinges, pulls or knobs, so I just tossed the hardware in a bag.

Step 2: I prepped the cabinets by washing them with TSP. I wiped them down with a rag and I honestly didn't even spend much time on this step. (I'll regret this later). I'm not starting this whole "professional painting" claim off real well.

Step 3: Then I sanded using my orbital sander (using 150 grit paper) and a multi-tool with a small sanding pad on it. The orbital sander helped me cover a lot of area quick, and a the multi tool allowed me to reach the tight spaces (like the trim) more thoroughly. I wasn't trying to remove the finish (just rough up the surface a bit), but it was so thin and worn out anyway that a light sanding really took off quite a bit of the poly finish.

Step 4: I used my shop vac to clean up loose dust and dirt. Then ran a tack cloth over ever inch of the surface to catch any loose particles that would get caught in paint.
Step 5: Using Zinsser BIN Primer (a shellac based primer), I brushed on one coat of primer. The primer dries rapidly (less than 5 minutes after I painted it on, it was already dry). I painted only one coat on the back of the cabinet doors, then I flipped the doors over to focus on the front. I painted one coat on the front of the door and one coat on the cabinet boxes. I never flipped the cabinet doors back over (until I did the final coat because I didn't really care if the wood grain showed on the back of the doors).

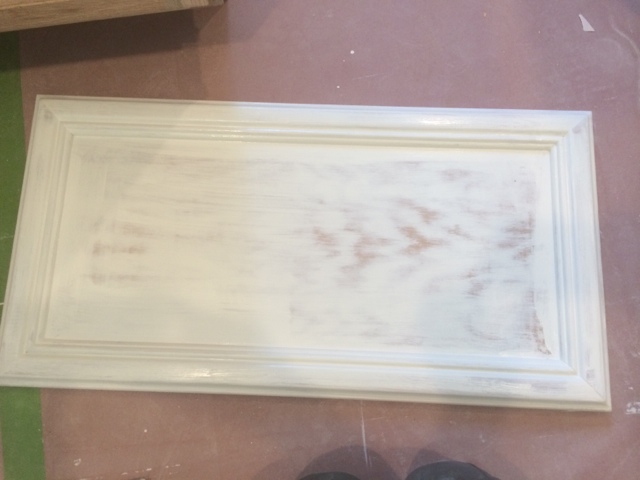
Step 6: Using my orbital and mulit-tool sander, I sanded the surface. The primer came off easily, but the purpose of my coats are to fill the wood grain and leave a perfectly smooth surface. Once I was done sanding, you can see below that the primer was mostly gone except for in the wood grain. Which is exactly what I wanted it to do.

Step 7: Using wood filler and a putty knife I filled in all holes with a wood filler. I planned to replace the hardware and the hinges, and so filled in all the holes on both sides of the doors (and on the front of the cabinet frame). I waited for the filler to dry, then sanded it down one more time and wiped with the tack cloth.


I repeated steps 4, 5, and 6 three more times on all the cabinet doors and the wood frames.
Sand, clean up, prime, sand, clean up, prime, etc.
Until I was cursing the doors and cabinets. Near the end there, I started begging Justin to allow me to buy new cabinets. He reminded me that we're also paying for a wedding this year, and then I retreated back to my dungeon of paint hell.
Every time I primed and sanded, more and more of the wood grain filled until some of it disappeared and the finish was as smooth as silk. After four layers of sanding and priming (and several weeks and hours later), I had enough and I decided that if wood grain still existed after all my work, then it deserved to be seen.
 |
| Coat #3 of Primer and Sanding |
 |
| 4 Coats of Primer (sanded and waiting to be painted with final coats) |
The doors were now ready to be coated with the final coats of paint.

Prepping them certainly took the longest time out of any project so far in the kitchen. A smooth finish requires a smooth base... I'm just going to keep telling myself that.
_________________________________________________________
I'm being featured over at Knock Off Décor right now! Check out my project by visiting http://knockoffdecor.com/gifts-ideas-for-dad-2-wooden-six-pack-bottle-crate/


Thanks for the informative post. This blog has shown some good ideas to decore the kitchen in new way.through this blog help you can give a new look to your kitchen! armadio scarpiera
ReplyDelete