
Choosing the paint color may have been easy. Choosing the flooring...a bit more difficult.

If you live in a house built prior to the 1960's you are probably very familiar with this lovely 9 x 9 tile. I have struggled with how to deal with it since before I bought my house in early 2010. Over the time of owning my house, and tons of research later, I discovered that you don't remedy this situation. You conceal it. And it took me almost 2 years to come to terms with that decision.
Remember the carpet that graced the basement before?

The previous homeowner attempted to cover up the tile with this blue carpet, which I have since used as a drop cloth for my house-ly projects. There was no pad underneath, it was glued directly to the concrete and tiles and it stopped abruptly in the middle of the floor.
My plan was also to cover the tile, but I was hoping to do it a bit more classy and tasteful. First, I had a few obstacles to get over before I could choose a floor.
- Remove the carpet and assess the condition of the flooring underneath. I preferred a floor in good condition so that the covering was as level as possible. Fortunately, all tiles were accounted for (with the exception of the 18" perimeter from the wall missing) and they were all in good condition.
- Ensure that water wasn't an issue in the house. There was only one way to do this, and it was to give it time. Two years may not be that long, but it was all the time I had to assess the situation. And things were good thus far. There are no guarantees, yet I'm hoping the basement waterproofing and the 2 sump pumps keep water a non-issue. And just in case all else fails, I added water and sewer back-up coverage to my insurance policy.
- Check into the waterproofing warranty. What can I and what can't I do to maintain the warranty? You can't nail or screw into the waterproofing. When installing carpet, the tack strips that hold the carpet in place are usually screwed into a subfloor. The installer would , therefore, have to glue them into place.
- Find a way to hide the 18" perimeter around the interior walls where the tile had been removed to install waterproofing. This caused a 1/8" offset between the concrete and the tile. Which really isn't a big deal, it just limited my flooring options. I could not install large ceramic tiles or a thin 'peel 'n stick' floor with this offset.
In order to overcome the obstacles above, I decided that my flooring options were limited to either carpet or floating floor. Neither of which were waterproof. But they did hide the ugly tile and offset created by the waterproofing.
I was inspired by Candice Olsen's design in this basement below. The ceiling is white, the walls are neutral and the brown carpet would definitely work in my space.
I was inspired by Candice Olsen's design in this basement below. The ceiling is white, the walls are neutral and the brown carpet would definitely work in my space.

The dark floors would mimic the warmness on the main floor of my house, and also help to ground the room since the walls and ceiling of the basement were light.
My parents graciously offered up 120 sq feet of plank floating floor that was at one time installed in their study. It was only installed for about a year before they replaced it with oak to match the rest of the house. They lifted up the flooring and stored it in the basement for the last few years. Free flooring? Yes, please. It was perfect for the basement yoga room. Although it wouldn't be enough to cover the full basement, it did provide a separator to differentiate the workout area and the "play" area.

I was happy to have this decision made, so after the paint went on we installed it and it looked like this...

Don't worry. I am going to cover up that sump pump. I just don't know how I will do that yet.
I was happy to accept free flooring for the yoga room, but still had 480 sq feet that needed covering. I collected dozens of samples of different prices and quality of a loop (or Berber) carpet since that is what I figured would work best in a basement. In order to get the look I wanted with a loop carpet I would have to spend over $3.00 per square foot, and I wasn't excited about that.
About 3 weeks ago, our friends moved into their new construction home and I was introduced to the brown frieze that was installed throughout their 2nd level. Justin and I immediately fell in love with it. We thought it might be a bit too "fancy" for the basement, but after some research, it turns out that the frieze we liked was actually cheaper than the Berber we were considering. We were sold.

Above is the Shaw Mocha Frieze that we chose. I keep thinking of the rust-orange carpet that was in my parents house prior to their renovation. Was brown the new orange...soon to be out of style? Um...I hope not.
Carpet was going to be the biggest part of the basement budget, so we set out to find the best carpet for the cheapest price. We ended up going with a thinner pile (which was $0.50 cheaper per square foot than the thick stuff), but with a nicer pad it felt the same. Sticking to my general rule, I called in 3 companies to quote for 480 sq feet of brown frieze carpet all the same style/quality and the same 8lb pad, similar warranties, installation and tack strips glued (rather than screwed) down.
- Empire (installed next day) - their original quote was $1,850 more than their final price after negotiating. They lost my trust after this, and also quoted me 30 sq feet less than the other two companies.
- Lowe's (installed in 2-3 weeks) - we could use my Dad's 10% veteran discount on the purchase of the carpet, but they wanted me to remove a row of tile along the interior wall.
- Local Flooring Company (installed in 1 week) - No negotiating. They gave me their best price.
Although Lowe's came in $20 cheaper than the local company we did not want to remove the tile. The local guy assured us it would be fine to keep the tile intact and we trusted his opinion and decided to go with the local company (we always try to support local companies if we can).
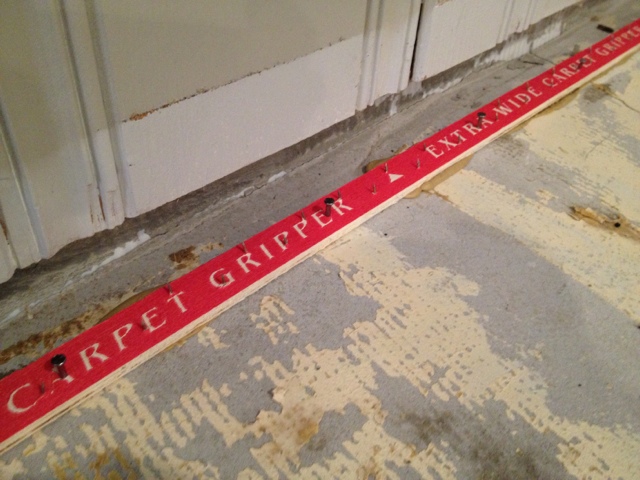
True to their word, within 6 days of ordering the carpet the tack strips were set in place with glue. Although it looked like the strips were nailed in, the nails apparently come standard. They just didn't hammer them down. I know this because I had a brief freak-out moment while on the phone with the local flooring owner.
I went into this renovation knowing that flooring would be the biggest chunk of the budget since we had over 550 sq feet to cover. It turns out that I over-budgeted for the flooring! Because of my parents generosity, we ended up saving over $300 by reusing their floating floor for the yoga room.
Let me tell ya...this whole process (while still not done) totally worth it. Stay tuned...

And that's one more item crossed off my to-do list!
- Fix all electrical violations
- Remove dropped ceiling
- Toss fluorescent lighting
- Clean up ceiling joists (so it is free from unnecessary wires, nails, hooks, spider webs, etc)
- Map out new floor plan
- Install new lighting (needs to be flush with bottom of floor joist to give me max ceiling height)
- Paint ceiling (floor joists)
- Put up new framing
- Hang dry wall
- Select color and paint walls
- Install access doors to water heater/furnace and both sump pumps
- Install floating floor in yoga room
- Select and install carpet in play room
- Paint and install base trim
- Paint asbestos tiles (yes, PAINT!) in new laundry room
- Expand Update existing water closet to include sink make it pretty
- Create workshop with pegboard
- Expand Organize storage area
Now, let's just pray that this basement stays dry.
Mary
Great post on flooring. It’s really going to help people to choose better floors for their homes.
ReplyDeleteThanks,
laminate flooring